Controlled by Authorization Object : S_ALV_LAYO
But this will restrict their access to maintain user Specific Layout also.
Reference
http://scn.sap.com/thread/1025300
SAP Notes:
409190
601803

Black Book
Controlled by Authorization Object : S_ALV_LAYO
But this will restrict their access to maintain user Specific Layout also.
Reference
http://scn.sap.com/thread/1025300
SAP Notes:
409190
601803
There are two ways to disable/enable the SAP menu and the User menu.
1. Configuration for all SAP users.
Go to transaction code SM30(Maintain Table Views) and maintain SSM_CUST table. Set ALL_USER_MENUS_OFF = YES if you want to disable the user menu for all SAP users and set it to NO to enable it again. For the SAP Menu, set SAP_MENU_OFF = YES to disable it or NO to enable it.
2. Configuration for individual specific SAP user
Again go to transaction code SM30(Maintain Table Views) and this time maintain USERS_SSM table. Initially there will be no data for this table. Now Click the “New entries” button on the application toolbar. The User Name field should be now editable. Now type in the user name that you want to configure. As you can see, there’s another four columns (User Menu, SAP Menu, Web Menu and Company Menu) with checkboxes on all of its rows. Just check it if you want to enable that menu or uncheck it to disable it.
Object type Bus2081 (Incoming invoice)
Workflow template: WS 20000397
Reference :
http://help.sap.com/saphelp_46c/helpdata/en/0d/e9c191014f11d3b4f9006094192bbb/frameset.htm
https://docs.google.com/open?id=0B6pQvNWTOMqvMlhvXzBnQlNCZms
Error is due to Memory allocation.
Check ST02 for parameter : abap/buffersize .
This can be changed directly at the OS level (path is displayed at the bottom of ST02 Parameter screen)
0r
Using RZ10 which is recommended.
Reference Documents.
http://scn.sap.com/thread/913058
Message determination is SAP is based on condition technique.
There are lot of scenarios and a lot of ways by which message determination can be configured.
The main elements of message determination are
1. Condition tables
2. Access Sequence
3. Message Types
4. Message Schema.
5. Condition Records
References :
http://help.sap.com/saphelp_47x200/helpdata/en/c8/198afa43b111d1896f0000e8322d00/frameset.htm
http://scn.sap.com/thread/786632
Step by Step Procedure
1. Create new condition table and configure for message determination . (Request For Access)
This document explains with screen shots how to
Default GL accounts and cost centers can be set for movement types for offsetting entries (expenses).
The cost center / GL account can be derived from the GL account entered or defaulted during goods movement.
Scenarios.
1. Default GL account for MVT Type
2. Default Cost Center for Mvt Type
3. Default GL account and Cost Center for Mvt Types
Step by Step Procedure.
Material Block in all Plants : Material Master – Basic Data
Plant Specific Blocking : Material Master Purchasing View for Plant
1. Create release strategy in SPRO .
2. Set up work flow indicator for Release codes and work flow.
SPRO –> MM –>Purchasing –>PR->Release Procedure->Setup procedure with classification
3. Activate Workflow Template : WS00000038
4. Make Work flow as generic.
Reference Materials
http://help.sap.com/saphelp_46c/helpdata/en/33/4c9a34272a5f2ee10000009b38f83b/frameset.htm
Configuration Guide.
1. Activate PR release work flow at item level. (Please submit Document Access Request)
Use:
Quantity differences between goods receipt and invoice receipt for a purchase order result in a balance on the GR/IR clearing account.
If no more goods or invoices are to be received, you must clear the balance manually.
Reference Documents:
http://wiki.sdn.sap.com/wiki/display/Snippets/MR11
http://scn.sap.com/community/erp/logistics-mm/blog/2012/03/08/impact-of-mr11-execution
http://help.sap.com/saphelp_46c/helpdata/en/43/34d338bd0a11d38aec0000e83234f3/frameset.htm
Standard WF Template : WS20000079
Business oBject : BUS2014
Rule for Agent Determination : 20000029
Events : Release Step created , Released , Significantly changed.
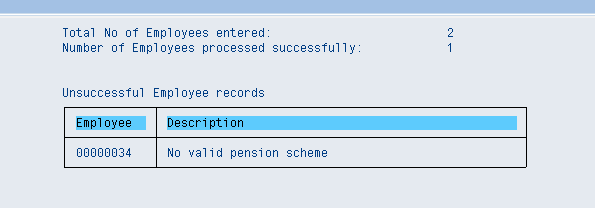
*&-Code extract to demonstrate the SAP write command-----------*
*&                                                             *
*& Author : www.sapdev.co.uk                                   *
*&  SAP ABAP development                                       *
*&-------------------------------------------------------------*


****************************************************************
*End-OF-selection.
End-OF-selection.


  write:/10(45) 'Total No of Employees entered:', gd_records,  "/10 indents 10 chars
        /10(45) 'Number of Employees processed successfully:', "(45) sets field lenth
                gd_success. "displays variable
  NEW-LINE.  "moves to a new line

  describe table it_error lines gd_lines. "gets number of records in a table
  check gd_lines gt 0.  "check there are some error records

  skip 2. "skips 2 lines
  write:/10 'Unsuccessful Employee records'.  "(10) makes field take up 10 chars
  write:/10 sy-uline(67).   "sy-uline(67) display a line 67 chars long

  write:/10  sy-vline,   "sy-vline creates a vertical line
        (10) 'Employee' COLOR COL_HEADING, sy-vline, "COLOR changes background colour
        (50) 'Description'  COLOR COL_HEADING, sy-vline.

  write:/10 sy-uline(67).     "display a line 67 chars long

  loop at it_error into wa_error.  "loops at err table
    write:/10  sy-vline,      "sy-vline creates a vertical line
          (10) wa_error-pernr, sy-vline,  "(10) makes field take up 10 chars
          (50) wa_error-text, sy-vline.
  endloop.

  write:/10 sy-uline(67). "display a line 67 chars long
g_repid = sy-repid.
call function ‘REUSE_ALV_GRID_DISPLAY’
exporting
i_callback_program = g_repid
* i_structure_name = ‘ZSDR075′
it_fieldcat = i_fieldcat[]
i_save = ‘U’
tables
t_outtab = i_out[]
exceptions
program_error = 1
others = 2
Without a call back program, you cannot save, because it does not know what
program to attach the saved layouts to.
Value range for I_SAVE
‘ ‘ = Display variants cannot be saved
Defined display variants (such as delivered display variants) can be
selected for presentation regardless of this indicator. However,
changes cannot be saved.
‘X’ = Standard save mode
Display variants can be saved as standard display variants.
Saving display variants as user-specific is not possible.
‘U’ = User-specific save mode
Display variants can only be saved as user-specific.
‘A’ = Standard and user-specific save mode
Display variants can be saved both as user-specific and as standard
variants. Users make their choice on the dialog box for saving the
display variant.
REPORT Z_TEST_REPORT.
data:

       BEGIN OF itab OCCURS 0,

         kunnr type kna1-kunnr,
         name1 type kna1-name1,

       END OF itab.

START-OF-SELECTION.

"we want to get data from the customer table where the keys
"are found in the sales order table (VBAK)

select kna1~kunnr kna1~name1 into CORRESPONDING FIELDS OF TABLE
   itab from kna1 inner join vbak on
  kna1~kunnr = vbak~kunnr.

sort itab by kunnr.

"There should be multiple customers data selected,
"Now if you want to show only 1 records per customer
"and remove all the duplicate rows, you can use the
"Delete Adjacent duplicates statement.

"Using Adjacent Duplicates to delete multiple rows
delete ADJACENT DUPLICATES FROM itab COMPARING kunnr.

LOOP AT itab.
 WRITE :/ itab-kunnr, itab-name1.
ENDLOOP.
Here’s a snapshot from itab at debugger screen, as you see there are multiple customers id in the internal table.

Here’s the result, now you don’t see any duplicates records. The comparing block at the Adjacent duplicates syntax can consists of more than one fields, for example comparing kunnr name1.

For any ABAP Report or an executable giving the selection criterion is important. Presenting the user with selection screen is very easy using Select-Options and Parameters in SAP ABAP.
The basic for of Select-Options in SAP ABAP is as follows.
Select-options: s_vbeln for vbak-vbeln.
In the above statement s_vbeln is defined as an internal table. And it has the following fields.
‘SIGN:’, s_vbeln-sign,
‘OPTION:’, s_vbeln-option,
‘LOW:’, s_vbeln-low,
‘HIGH:’, s_vbeln-high.
__________________________________________________________
Valid data types of f include all elementary ABAP types except data type f. You cannot use data type f, references, or aggregate types.
We will explore Select Options with the help of a small program shown below.
__________________________________________________________
REPORT ZEX_SELECTOPTIONS.
Tables: VBAK,
VBAP.
Data: int_vbak type vbak occurs 0 with header line.
Select-options: s_vbeln for vbak-vbeln.
Select * INTO int_VBAK from VBAK where
VBELN in s_vbeln.
APPEND int_VBAK.
CLEAR int_VBAK.
ENDSELECT.
Loop at s_vbeln.
WRITE: / ‘SIGN:’, s_vbeln-sign,
‘OPTION:’, s_vbeln-option,
‘LOW:’, s_vbeln-low,
‘HIGH:’, s_vbeln-high.
Endloop.
loop at int_vbak.
Write:/ int_vbak-vbeln, int_vbak-AUART.
endloop.
_______________________________________________________
Once the above program is executed, then the user is presented with a selection screen as shown below.
Sales Order No. ___________| to ___________ >>
Basically here you can enter the Sales Order Number as follows.
1) Single Entry
2) Range
3) Selected Sales Order Numbers
In case the user enters only a single Sales Order number then only one order gets selected and the output of the code,
Loop at s_vbeln.
WRITE: / ‘SIGN:’, s_vbeln-sign,
‘OPTION:’, s_vbeln-option,
‘LOW:’, s_vbeln-low,
‘HIGH:’, s_vbeln-high.
Endloop.
is as Follows
SIGN: I OPTION: EQ LOW: 4969 HIGH:
_________________________________________
In case the user enters a range from 4969 to 4977 then the output of the above code is
SIGN: I OPTION: BT LOW: 4969 HIGH: 4977
_______________________________________________
In case the user enters only selected values as 4969, 4970, 4971, 4972 the the output will be as follows.
SIGN: I OPTION: EQ LOW: 4969 HIGH:
SIGN: I OPTION: EQ LOW: 4970 HIGH:
SIGN: I OPTION: EQ LOW: 4971 HIGH:
SIGN: I OPTION: EQ LOW: 4972 HIGH:
SIGN: I OPTION: EQ LOW: 4973 HIGH:
______________________________________________
Note: The output shown above is for the internal table of select options. The result of the selected Sales Order will be different. You can run the code given above and see the output
The following post is not users who are new to ABAP.
Step for creating a Simple report in ABAP.
References:
http://www.saptechnical.com/Tutorials/ABAP/InteractiveReport/Demo.htm
http://www.saptechnical.com/Tutorials/SAPQuery/ABAPCode/Page1.htm
Documents
Program to Display Composite roles –> Single Roles –> TCodes (Request for Access)
Issue
PO is created without PR even after PR is made mandatory in PO field selection.
Reference Documents :
1. SAP Note : 664424 : Requisition number not mandatory in ME21N
Conclusion :
To make Purchase Requisition mandatory for creating PO’s
1. Maintain Parameter as mentioned in the above note.
2. Add PR check in PO User Exit.
How to maintain default scope of list (ALV , RAHM) to each transaction ?
Solution:
SPRO -> Materials Management -> Purchasing ->Reporting -> Maintain Purchasing List -> Scope of List / Selection Parameter -> Define Default
How to reject contract using ME35K ?
1. There is no standard functionality for rejecting Contracts like PO and PR.
Reference :
Setting-up a Role for the InfoSet Query
Reference Link : http://help.sap.com/saphelp_dimp50/helpdata/EN/86/0bf9392486ce1ae10000000a114084/content.htm
Use
To be able to create an InfoSet Query, the system administrator must set up a role for the work with the InfoSet Query.
Roles can be assigned to SAP user groups in SQ013 instead of individual user names.
…
1. A role has to be assigned specifically to a single SAP Query user group. This is because the InfoSet Query is derived from the SAP Query.
a. Call up the Role Maintenance (RSQ10). You get to a table containing the roles that are relevant for working with the InfoSet Query.
b. Choose the role you want, and use the Assign User Group function (second column in the table) to assign a user group to the role, or to remove an existing assignment.
When you are assigning user groups, a dialog box appears asking you if you want to create a new user group, or use an existing one. Use the input help to choose from the available user groups. It is not possible to assign a user group to more than one role.
When you have assigned a user group successfully to a role, the name of this user group appears in the third column of the table.
It is also possible to jump to the Query Builder from the SAP Easy Access SAP Business Information Warehouse Menu by selecting the InfoSet Query entry from the roles in the user menu.
2. Assign Classic InfoSets to the role. Use the Assign Classic InfoSets function to do this (fifth column in the table).
A screen containing all the available Classic InfoSets appears. Select the InfoSets that you want to be able to use for defining queries within the role.
You are able to choose one of the selected Classic InfoSets as a standard Classic InfoSet (entry in the fourth column of the table). The standard Classic InfoSet is subsequently used as a template, if the components for maintaining InfoSet Queries are called using the menu entry mentioned above.
3. In the Maintain Role transaction (PFCG) you assign the role you have set up to those users, who are going to work with the InfoSet Query.
SAP Role Menu is a functionality to maintain roles specific to business functions.
Users can use T-code : S000 to view SAP standard menu
Reference Links
http://scn.sap.com/thread/570471
http://help.sap.com/saphelp_46c/helpdata/EN/00/783b377bfdcf61e10000009b38f936/frameset.htm
Reference Documents: (Request for Access)
Guide for setting up Role menu
https://docs.google.com/open?id=0B9ndtf95tEzAaFkzOTBXSWJDMGc
https://docs.google.com/open?id=0B9ndtf95tEzAZkdPMVV5NmFhZ0k


